Friday, 24 January 2025
Build an 8x10 shed with easy-to-follow construction plans

Building Your 8x10 Shed: A Step-by-Step Guide
Building your own shed is a rewarding project that can save you money and provide a valuable addition to your property. This guide walks you through constructing an 8x10 shed, focusing on simplicity and clarity. We'll cover everything from preparing the foundation to installing the roof, ensuring you have a sturdy and functional storage space in no time.
Phase 1: Preparation and Foundation
Before you even think about hammering a nail, careful planning is crucial. Begin by securing the necessary permits from your local authorities. This prevents future headaches and ensures compliance with building codes. Next, choose a level location for your shed, considering access and proximity to utilities. You'll want ample space for working around the structure during construction.
Laying the Foundation
A concrete slab provides the most robust and level foundation. Mark out an 8x10-foot area, excavate to a depth of 4-6 inches, and compact the soil thoroughly. Next, construct a formwork using pressure-treated lumber, ensuring its level and square. Pour and level your concrete, allowing ample time for curing (at least 24-48 hours) before proceeding to the next phase. Alternatively, a gravel base offers a simpler, less expensive option, but offers less stability. Level the area and compact the gravel before laying down a pressure-treated plywood base for your shed.
Phase 2: Framing the Walls
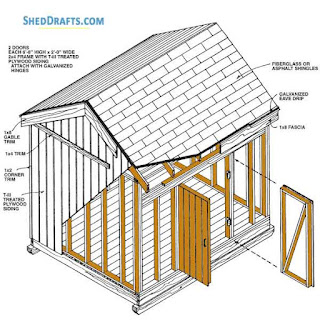
This phase focuses on building the shed's framework. Using pressure-treated lumber for the base plates and corner posts ensures longevity and rot resistance. Measure and cut the lumber precisely to avoid future issues. We recommend using 4x4 posts for corner support and 2x4s for wall studs. For optimal strength, space the studs 16 inches on center.
Assembling the Walls
Construct each wall separately on the ground. This allows for easier assembly and reduces the chance of errors. Securely fasten the studs to the base plates using appropriate screws and a drill. Remember to add a double top plate for additional strength. Use a level frequently to ensure vertical alignment and square corners. Once the walls are complete, carefully lift and position them onto the foundation, ensuring they are plumb and properly aligned.
Phase 3: Roofing and Siding
The roof is a crucial element for weather protection. We recommend a simple gable roof design for ease of construction. Cut and assemble the rafters according to your chosen pitch, ensuring proper overhang. Use appropriate connectors and fasteners to create a strong, stable framework.
Installing the Roofing and Siding
Once the roof framework is complete, install roofing felt or underlayment to provide a waterproof barrier. Then, install your chosen roofing materialâ€"asphalt shingles are a cost-effective and readily available option. For siding, choose a material that complements your style and budget. Vinyl siding offers low maintenance and durability, while wood siding provides a more rustic look. Attach the siding to the wall frame using appropriate fasteners.
Phase 4: Doors and Windows
A shed door provides access to your storage space. Choose a pre-hung door for ease of installation. Carefully measure the opening, and cut to fit precisely, ensuring a snug fit. Use appropriate hinges and a sturdy latch mechanism to provide secure closure. If you're including windows, follow a similar process, ensuring they're properly sealed to prevent drafts.
Phase 5: Finishing Touches
Once the main structure is complete, attend to the finishing touches. Add trim around the doors and windows to enhance the aesthetics and weather resistance. Consider adding a layer of paint or sealant to further protect the wood from the elements. Add shelving or other interior organization systems according to your needs.
Disclaimer: This is a simplified guide. Always consult professional building codes and seek expert advice if needed. Safety should always be your top priority. Wear appropriate safety gear, such as safety glasses and work gloves, throughout the construction process.
No comments:
Post a Comment
Note: only a member of this blog may post a comment.